Our Math Houses
We are creating 2D and 3D models of houses in our class. These are purely math and art based, and do not require adherence to building codes.
Steps 1 - 5 is the 2D model, to complete before winter break. Steps 6 - 7 is the 3D model to be completed by the end of January.
Steps 1 - 5 is the 2D model, to complete before winter break. Steps 6 - 7 is the 3D model to be completed by the end of January.
- Step 1: Measure (in metric) fixtures and furniture so that we can create rooms that appropriately sized. We don't need bathrooms that are 5 meters by 5 meters, but nor can we have a bedroom that is one meter by one meter...
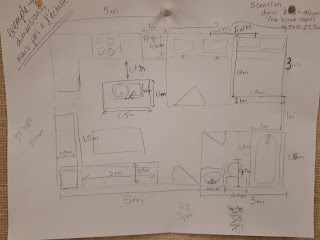
- Step 2: Lay out the house with real-life dimensions. This does not need to be to scale.
- Step 2b: Confirm that the dimensions work. For example, if you intend to have a rectangular house, the front and back walls need to be the same total length.

- Step 3: Calculate the scale of the rooms, furniture and fixtures (5cm:1m)
- Step 4: Draw the good copy lightly in pencil, including fixtures and furniture.
- Step 5: After approval from Mme, retrace and label the 2D model with black ink.
- Step 6: Decide on a material for the 3D model. Plain paper and white glue will be provided by Mme, all other materials must be provided by the students.
- Step 7: Build your 3D model based on your 2D model, adhering to the scale for the heights of walls, furniture and fixtures.
Expectations:
- 4 rooms: kitchen, living room, bedroom, bathroom
- Scale 5cm:1m
- Use of math tools (ruler, etc.)
- All aspects are to scale
- Art for 2D project:
- Elements
- Line
- Texture
- Principles
- Proportion
- Harmony
- Art for 3D project
- Elements
- Colour
- Shape
- Space
- Principles
- Proportion
- Unity


Comments
Post a Comment